
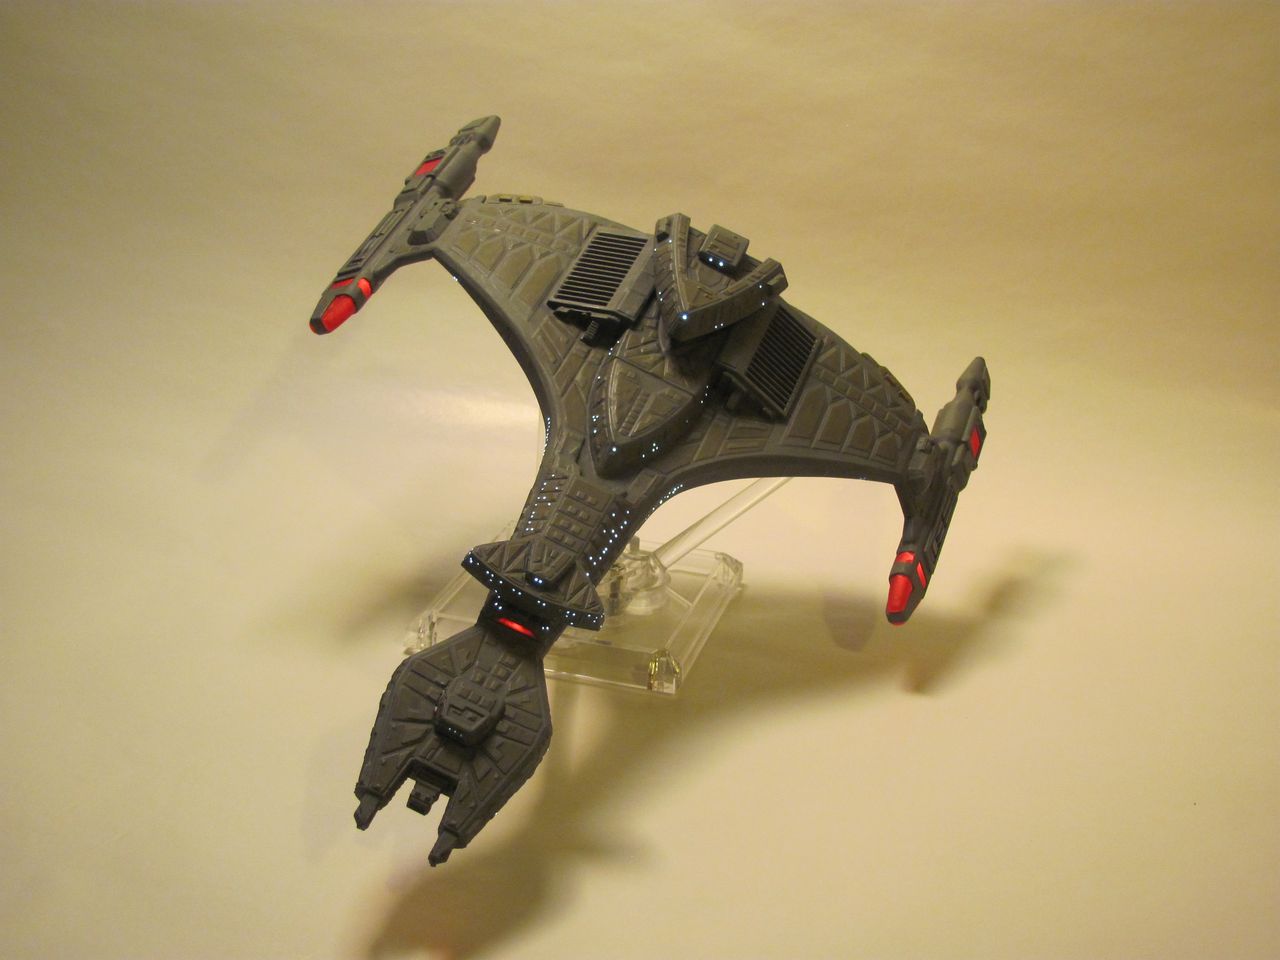
After sitting in my model stash for 15 years, I decided to finally build the Klingon cruiser that debuted in the Next Generation. I’ve been holding off until my skills and time could hopefully do it a measure of justice. I always liked this design as a heavy compliment to the smaller bird of prey ships that the Klingons were known for.
The kit itself wasn’t very complicated, only about 30-40 parts. The molding was ok, not excessively detailed, but decently so. Aside from the engine pylons there were no major fit issues, though the main body didn’t have any guide pins, only groves. That made assembly a bit interesting, but there were no major difficulties in the assembly.
One reason I waited so long to build her, was that I wanted to light the ship. I’d only done one other fiber optic lighting project before and it hadn’t gone so well, so I shelved this until I felt like I was ready.
My first step was to drill out the windows. I used a small pin vice and finally got all 184 windows drilled out. This was mostly just a long boring process, but there were a few tight spots around some of the corners that required a bit of creativity to get the channel drilled for the fiber optic. In the end though, none of it was overly complicated. Then I ran the fiber optic through all the windows and built some channels to light box the cables in the center of the main hull. All the fiber from the peripherals was ran back to there for the main white lights. The biggest difficulty that came from that was that the head piece had something like 50 strands of fiber and I had to almost drill out the entirety of it’s post to make a channel for the fiber bundle. Luckily, it fit and I’d sized everything right. Overall I probably ran 300 feet of fiber through this kit.


For the lighting, I decided to use red leds for the engines, nacelles and forward emitters, and white leds to light the window fiber. All of the LEDs were wired on parallel circuits so that if one LED burns out, the rest will still work. I also placed two leds for the main whites so there is a backup. Given the way this kit is put together there is no way to tear it apart to replace the LEDs so I wanted some redundancy.


For power, I placed a small 3.7 volt camera battery inside. I drilled out the two pieces on the ends of the ‘wings’ so that one side could house a concealed power switch and the other hosted a power terminal so the battery could be recharged. Fully charged, the battery can power everything for about 3 hours. I plan on building a nicer looking charger cable so I can light and charge at the same time, and the battery has been wired in parallel to accommodate that.
Now for the lighting goofs. First, I tried to use a mismatched adhesive to secure the fiber, some kind of super glue. It nicely melted my fiber, and required me to pull the half melted fiber out, redrill and replace across several parts of the model. The next big goof was insufficient light blocking. I did a good job on the engines and nacelles, but didn’t do enough on the bright white mains. In the end, I had to add extra coats of paint on the outer paint job to block the light, which had a detrimental effect on the surface details. Word to the wise, build light boxes in your kit! That and make sure to have a nice heavy interior layer of black paint covering everything that’s around your light source to prevent leakage. If you want to overcoat that with another color to make an effect, that’s great, but don’t skimp on the light blocking.


Once the lighting was done, I started work on the exterior painting. My intention was to give it the feel of the paint scheme used during Deep Space 9, where the Klingon ships were given a dark greenish/gray look. I started with a base coat of Model Masters Slate Gray to coat the whole kit. Then I did the major panels in Olive Drab and minor panels with Faded olive drab. After that, I dry brushed Anthracite gray metallic over the whole kit. Finally, I did a wash of black acrylic paint to help even out the tone and pop out all of the details and panel lines. Generally, I’m pleased with the overall effect.
So that’s it. Thanks for dropping by!


Recent Comments